No Fuss Guide To Using A Floor Sander
Wooden floors are an excellent choice when it comes to choosing your flooring. Why? Because no matter how much grief it goes through, you can always reclaim it back to its former glory. Just like getting a brand-new floor installed every time. The way to breathe new life into your former wooden flooring is to sand it, using a floor sander. In this article, we will share with you the no-fuss guide to using a floor sander.
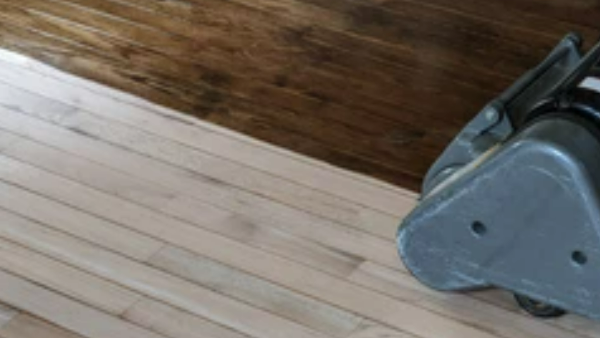
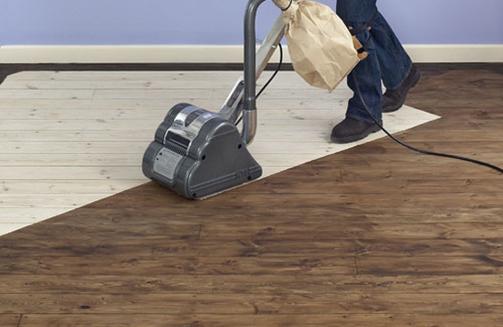
A floor sander looks remarkably like a classic hoover, however with a few major differences.
This machine saves users from having to bend and sand the entire area by hand. Its hoover-like appearance allows operators to comfortably stand to achieve ideal sanding results, faster. The dust that is generated by the machine is collected during operation into a convenient waste bag.
Floor sanders are ideal for floor renovations and the preparation of floorboards. Their 6-inch rotating belt can be fitted with grit papers such as 24/40/60/80/120. This gives operators the ability to interchange the texture of the sander paper with which they are working.
Quick fire questions on a floor sander
Can they fit in the boot of a car? Yes.
How are they powered? Electricity, 240V. Models may vary.
How much to hire a floor sander? Depending on where you hire from, expect to pay around £58.00 +VAT a week plus paper.
Does a floor sander require a professional to operate it? No, however a professional will no doubt complete the task faster and more accurate.
Is the machinery noisy? Just like a heavy-duty vacuum, it is a loud piece of equipment.
Before you start sanding your surface, you should be sure that you are wearing the correct personal protective equipment (PPE). It is extremely important that when operating a floor sander you wear, eye protection, safety boots, a dust mask and gloves. Wood dust can be dangerous and harmful if you are exposed to it for long periods.
Guide to using a floor sander
Now you have your hands on a sander and got your protective equipment on. It is time we learnt how to safely operate the machine.
Before we start sanding, you need to make sure that the area is prepared correctly. This means that the room is empty, and any unnecessary obstacles have been removed during this time. It is important to remove any nails or screws that are proud of the surface as they will only damage the machinery.
Preparing the machine
After checking our floor for any potential issues, we need to prepare the machine to work. Now depending on the make of floor sander you have, could require additional equipment to power it. Floor sanders come equipped with a 240V plug, which can be powered in any UK household. However, sometimes this is not the case as some floor sanders are fitted with 110v plugs.
If you are lucky enough to get yourself a 110v floor sander, then you need to make sure that your hire supplier offers you a transformer. This transformer will allow you to use the equipment safely. Simply plug the transformer into the mains, and then the sander into the transformer. The plugs and connections will all fit we assure you.
Transformers are quite commonly used on electrical equipment throughout the construction industry. 110V is far safer for operators if something is to go wrong. If you are ever unsure how to operate your floor sander from a transformer always ask your hire expert.
So we have established our power, now we need to install our sandpaper. This is done by lifting the front flap to expose the roller. From here you will require a small screwdriver to loosen the holding screws. Loosen the two holding screws but not too much, you will find that they are spring-loaded and don’t require too much persuasion.
Choose your grade of sandpaper, normally it is best to start with medium grade and interchange once you have begun. This is wrapped around the roller and fixed under the holding screws grip bar on the roller. Tighten the screws when positioned correctly.
By now, we have our you should have your PPE on, roller power should now be attached, and sandpaper is attached. Time to get sanding.
How to operate a floor sander
All that remains now is to switch on the machine and get standing. Here is how to get started.
Position yourself in the corner of the room you are sanding. If you are working with floorboards, you will want to start by working along the grain (lengthwise) down the board. For parquet flooring, you will need to be sure to sand in two different directions.
Start the machine by clicking the power button found on the neck of the machine. The roller pulls the machine forward and can be engaged by pulling the two levers on the control handles of the machine. As soon as these are engaged, the machine will start pulling itself forward.
Start in the corner and tackle the floorboards in strips that overlap about 3inch at a time. Once you have finished sanding you can repeat the process with finer grades of paper to achieve your desired look. Simply interchange the sandpaper as you did to originally prep the machine.
When operating, keep the sander moving across the floor at a constant speed. Any hesitation or stopping will result in the floor’s surface being damaged. Rutting will occur on the surface and the floor will require re-sanding. This rutting effect will occur on any type of wood (Hard or Soft). At the end of a strip, immediately raise the drum from the surface then switch the sander OFF and wait for moving parts to stop. Next, move the sander back to the starting point and begin sanding the next strip.
Once you have reached your desired finish, you will require an edging sander to get to the finer details around the floorboards.
Key tips to using a floor sander
To get the best result when sanding your floor, there are a couple of tricks of the trade you can follow to ensure you maximise your productivity and efficiency.
First, pass diagonally over the floors to finish. This ensures you sand out any ridges that have been left from lateral passes or have worn over time.
Second, which we have slightly touched on before, is to remove sharp objects that could tear through the sandpaper roller. If you have either proud screws or nails, ensure they are either removed or well driven in.
Finally, when you come to turn the sander for your return pass, always make sure you disengage the roller. This is done by tilting the machine backwards. This avoids ridges from forming by the roller as the machine is turned.
Always empty the dust bag when it is around 1/3rd full. Sander dust is extremely flammable therefore be careful how you dispose of it.
Where to hire a floor sander today
WHC Hire Services offers a large stock of floor sanders and sandpaper to suit any size of a domestic or commercial project. With 20 years of experience in supplying world-leading equipment of woodwork equipment, we have a solution for most common practices. With regular investment in the quality of our equipment, we can provide the safest and most efficient equipment on the market. Find out more about a Floor Sander here or give your local WHC Hire Depot a CALL to arrange your equipment.