Rotavate Your Garden: Things A Professional Won’t Tell You.
Ever wondered why some people’s gardens look spectacular every year? There is no doubt that a huge amount of time, effort and care has gone into hours of manicuring. Generally, in this day in age, outdoor spaces like this are achieved through the help of a professional. But… there is another way…one that will save you hundreds of pounds a year provided you are willing to set the foundations in place. In this article, we are going to help explain the reasons why you should rotavate your garden. This resource will also uncover the trade secrets of why professionals regularly use specific machinery to get the job done effectively and efficiently. Let’s dig into it!
Why Should You Rotavate Your Garden?
So… why should you choose to rotovate your garden? Rotavating is the best way of preparing soiling for whatever project you are undertaking. This could be for laying turf for a new lawn, planting seeds in an allotment or garden veg patch, or in flower beds. If you need anything to grow either on top of or in soil, preparing the base layer with a rotavator is the best way to set the course for success.
Rotavators are specially designed to help churn and aerate the soil, which reduces compaction while improving drainage all at the same time. Rotavating is also great for uncovering buried debris and allowing water and nutrients to reach the roots of the plants or grass.
Using a rotavator for your outdoor projects will save you a huge amount of time and reduce the risk of injury by doing the job by hand. Instead of using a hand fork, the blades of a rotavator will churn, arete and break up soil for you. These powerful pieces of gardening equipment will not only speed up the process but will deliver a far more even finish, unlike hand digging.
Rotovator Design To Expect To Hire: Rotavate Your Garden
If you are considering hiring a rotavator, then you may find yourself choosing between several options. There are two types of rotavators that you will find at your local hire depot. A petrol walk-behind rotavator and a rotavator attachment.
So, how do these two designs differ and what is suitable for which type of project?
Walk-Behind
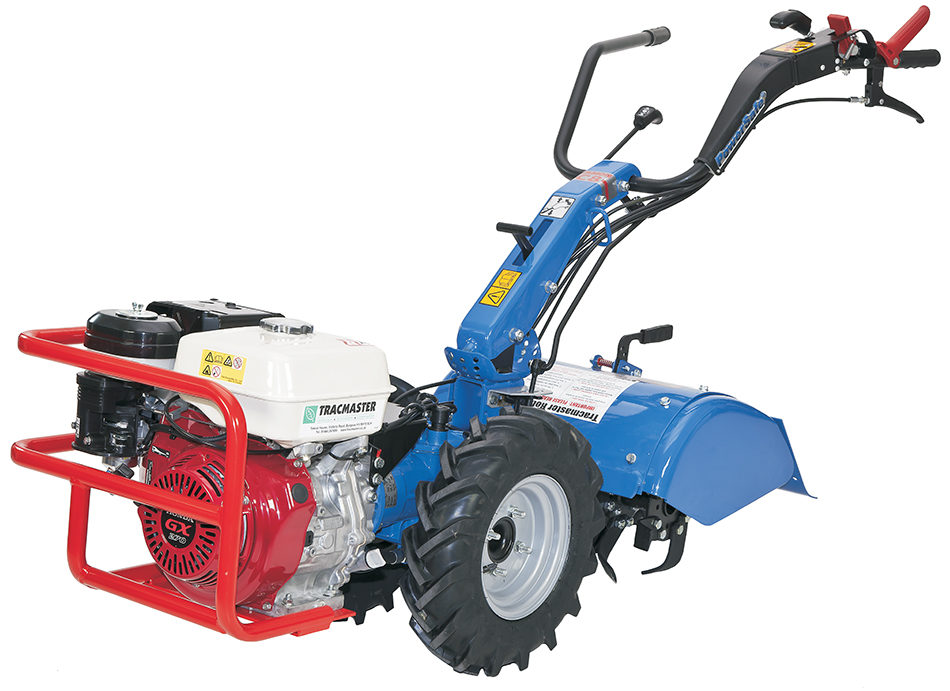
Walk-behind petrol rotavators are amongst the most common machines to rotavate your garden with. These machines are highly popular for projects of all sizes. Whether you are laying a new lawn, preparing beds for seed or planting, they’re a great choice! Powered by a small petrol engine, these rotavators can make the job quick and easy. Be aware that machines of this size are extremely heavy to lift, therefore you should always assess the entrance and exit points of the area you are working.
Though these machines will pull themselves along with their built-in drive system, they can struggle on very steep terrain. However they do offer a working width of around 500mm depending on the design and specification of the equipment. It is important to bear in mind the cutting width, as this will determine the minimum amount of passes you will need to cover your working area.
Attachments
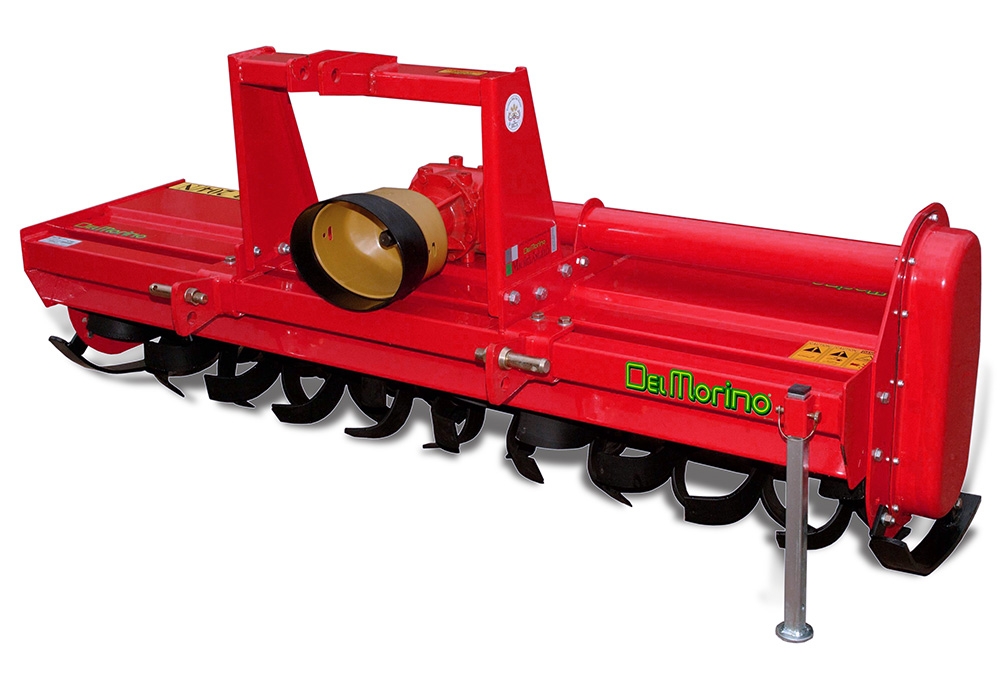
Where space allows, rotavator attachments can be the ultimate piece of cultivating hire equipment. Why? Well, unlike a petrol walk-behind machine, rotavating attachments are connected to the rear of a compact tractor. The machinery itself is powered by the PTO (power taken off) shaft from the rear of the machine. This can provide a larger force overall, especially when working in tougher conditions. Machines like this are commonly used on large building sites for soil preparation. Nevertheless, still can be used on small projects where access permits.
Using a PTO tractor rotavator can dramatically speed up cultivating, especially on large-scale projects like allotments or building sites. Attachments like this can cover over 1300mm per pass, amounting to over double the distance you can expect from and standard walk-behind machine. As this component is attached to a compact tractor, it also has the ability to work almost anywhere, on whatever terrain.
It is worth considering the following factors when choosing the right type of rotavator for your project.
Factors To Consider: Rotavate Your Garden
- Size of project
- Experience using machinery
- Depth required to cultivate
- Time required to complete task
- Transport
Size of Project
If you have got a large area to cover, you may wish to opt for a bigger machine to reduce the number of passes you will ultimately be required to complete.
Experience Using Machinery
If you are inexperienced with this type of machinery, you may wish to opt for the simplest and easiest available to you. Do not get caught up using machinery that you feel unable to safely handle.
Depth Required To Cultivate
The depth that you wish to cultivate it extremely important in choosing the right rotavator to hire. Some projects require deeper cultivation such as planting vegetables, compared to laying a new lawn.
Time Required To Complete
If you are on a short time scale or budget, you need to choose a piece of equipment that will deliver on both accounts.
Transport
No matter which rotavator you choose, the machine will be very heavy and may require help loading and unloading. It is very common for equipment like this to be delivered to where it needs to be operated. Always consult your hire supplier with regard to machinery weight.
How To Rotavate Your Garden?

Before starting, ensure that as much debris has been removed from the area that you are working on. This firstly avoids any nasty accidents from happening or the equipment getting damaged. Be sure to target objects such as stones, sticks, twigs, bricks, weeds and roots. You can use a metal rake to help you complete this preparation more effectively.
Starting The Machine
Ensure that the equipment is in the correct working position before starting. Most machines can be manoeuvred into position without engaging the rotavator output. Be sure that you read the operator’s manual and take advantage of machinery walk-throughs during handovers from your supplier.
Work Lengthways
The most efficient way to operate a rotavator is lengthways across your working area. This will allow you to easily identify the areas you have already covered when operating. However, if your ground is particularly hard to work with, you may need to complete multiple passes in different directions to achieve a consistent result. The quality and current compaction of the soil will have a massive effect on this.
Adding Organic Matter or Topsoil
Once you have achieved the desired consistency you require, now is the time to add in any additions that may help grow either your new lawn, seeds or crops. It is common to use fertiliser to improve the soil structure to encourage healthy roots. After, simply pass the rotavator over the area once again before levelling finally with a rake.
Let Ground Settle
It is important to let the ground settle before laying turf or planting. During rotavating, air pockets under the surface form. Therefore, this may require additional topsoil to level. Leaving the surface a few days to settle should be adequate to recommence work.
The Do Not’s: Rotavate Your Garden
So, think you up for taking on the challenge of rotavating your project yourself? Well, before you set off, there are a few things you must know that the professionals won’t tell you…
Don’t Rotovate Too Deep
Rotavating too deep can cause soil instability especially when there is a downpour. Depending on your task, you should never rotovate deeper than you need to. In the case of growing crops like, for instance, potatoes, then a deeper method will have to be adopted for successful planting.
Don’t Walk On Your Work
Walking directly on top of your work is a rooky mistake to make. But you wouldn’t be the first to do so. Most walk-behind machines can set up the controls to walk alongside rather than on top of the work you have already completed. Directly walking over your work afterwards will cause unnecessary compaction that you will want to avoid.
Don’t Rotovate Wet Ground
Rotavating wet soil is not something we would advise anyone to do. It can be extremely damaging to soil structure. Light and sandy soils are best dug in spring but anytime from Autumn onwards. It is always best to avoid rotovating during periods of water-logging or ground frost. Clay soils should be tackled during the Autumn months when the chance of high moisture levels is low. Rotavating wet ground will also put additional stress on your hired equipment that you will be liable for.
Machines Like a Rotavator? Confused?
You may have come across many names and types of equipment like a rotavator. Well, to help put the story straight and help you understand the difference, here are other pieces of equipment like a rotavator:
Tiller
A tiller is a small handheld soil-churning machine that operates on tines that pull the machine forward through the soil. These machines are highly portable but lack the power you may require for cultivating your project area.
Cultivator
A cultivator is very similar to a rotavator in terms of size. Where the machine differs is that it does not operate on wheels. Cultivators are ideal for mixing already aerated soil on large scales, however, lack the power for large landscaping jobs.
Where To Hire a Rotavator For Your Garden Project?
To get more from your ground equipment hire, why not speak to our friendly experienced team at WHC Hire? Our team of experts will be able to help you find the right tool to get the job done. We offer a range of rotavators to suit all project sizes. From commercial new builds to, DIY projects. Click here to see our range of gardening equipment or call 01684377977 today!