The Complete Guide To Floor Sander Hire

Looking to give your tired old wooden flooring a new lease of life? How hard can it be..right? Well, by hiring a floor sander, you can certainly take the effort out of the task at hand. Many DIY enthusiasts opt for floor sander hire as an easy and cost-effective way to transform their indoor space. Whether you’re restoring tired old floorboards or prepping for a fresh finish, you can quickly achieve a professional result in no time.
Before you dive into the job, it’s worth taking a moment to get familiar with the key things you need to know about floor sander hire — including answers to the most common questions we hear from first-time DIYers. By reading this guide, you’ll be able to hire more confidently, achieve better results, and avoid many of the typical mistakes people make when using a floor sander for the first time.
Types of Floor Sander Hire
Floor sanders are extremely powerful floor preparation tools that can be used to remove the top surface layer of wooden flooring. Unlike doing the job by hand, these machines save a huge amount of time and effort by eliminating old varnish, removing stains, uneven textures and imperfections developed over the years. Using these machines will leave your timber flooring ready for resealing or refinishing.
You’ll typically use two types of floor sanders to get the job done — and it’s worth knowing what each one does.
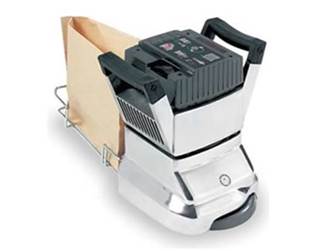
Drum Sander (Floor Sander)
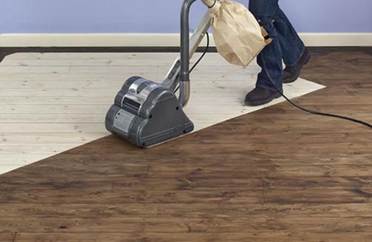
A large upright machine housing an 8-inch drum, used for large open areas of flooring. Often, this is the machine that DIYers will opt for most home renovation tasks.
Edge Sander
A small handheld machine that is able to work closely up against floorboards, reaching where the drum floor sander cannot. Without the use of an edge sander, DIYers would have to conduct this task by hand.
While these machines operate differently, they work hand in hand when it comes to sanding your flooring. It is often that many DIYers will not consider using both tools to complete their projects at first until they realise the additional work that is required.
Most reputable tool hire companies will offer both machines as a bundle hire package.
What Floors Should You Use A Floor Sander On?
Getting the right tool is key to any job, and floor sanding is no different — especially when you’re hiring the equipment. It’s common for inexperienced DIYers to use a floor sander on the incorrect surface, leading to equipment damage and costly repair fees.
To avoid any delays or nasty surprises, you should use a floor sander only on the following flooring:
- Solid hardwood flooring (Oak, Pine, etc)
- Engineered wood flooring with at least 3mm wear layer
- Original timber floorboards in good condition
- Parquet floors (geometric patterned engineered flooring)
What Floors Should You Avoid Using A Floor Sander On?
Using a floor sander can be a highly efficient way of preparing your flooring for resealing or refinishing. However, these machines are not suitable for all applications. We highly recommend avoiding using a floor sander on:
- Laminate flooring
- Vinyl flooring or LVT (Luxury vinyl tile)
- Thin, swallow-engineered wood blocks. (Always allow a 3mm wear layer)
- Damaged or warped floorboards
- Outdoor decking- for best results, use a belt sander.
If you’re unsure about the type of flooring you have or whether a floor sander is the right tool for the job, feel free to ask our team for advice.
How Much Does A Floor Sander Cost To Hire?
Before you decide to hire a floor sander, you’ll want to know the cost! DIYers should expect to pay around £26.00- £70.00+ VAT a week, depending on the type of sander and duration of hire. In addition, there are several other factors that can increase the cost of hiring. Addressing these can better prepare you when budgeting to hire this equipment.
Factors That Increase Floor Sander Hire Cost
Type of Sander
“Drum sanders and edge sanders usually cost different amounts to hire. Before you book anything, make sure you know which one you’ll need for your project. Most hire companies (like WHC!) offer a bundle deal if you need both — so it’s always worth asking about money-saving options.
Duration Of Hire
The longer you hire a sander or sander package, the higher the overall cost. If you need floor preparation equipment for a longer period, it’s best to speak directly with your supplier about potential long-term hire discounts.
Rental Provider
The cost to hire a floor sander will vary depending on who you choose to hire your equipment from.
Delivery
Both floor and edge sanders are easy enough to transport by yourself. However, in some instances, having the equipment delivered can save a lot of hassle. If you decide to have your floor sander delivered, this will incur a further charge on your overall hire. For a delivery quote, speak to your local supplier for the latest rates.
Grit Sheets
When you hire a floor sander, you should be given a range of sanding sheets in different grit levels — usually starting with a coarse 24 grit for the rough first pass, up to a fine, 120 grit for a smooth, professional finish. Keep in mind that sanding sheets are usually charged separately, so the more you use, the more it will add to your final cost.
Dust Bags
Along with sanding sheets, both floor and edge sanders require dust bags to work safely. For bigger jobs, you might go through several dust bags depending on your project scale. These too are charged separately when hiring this equipment.
How Are Floor Sanders Transported?
Floor sanders are designed to be easy to transport and store. Most models can be taken apart into smaller, more manageable pieces — often fitting into the back of a standard hatchback. Many also come with built-in transport wheels, making the whole process even easier. This makes them a great option for DIYers who want to handle the transport themselves.
Edging sanders can be easily transported due to their compact and lightweight design. If you ever have any concerns with transporting either a floor or edging sander, speak directly to your tool hire supplier.
How Are Floor & Edge Sanders Powered?
Most floor and edge sanders are usually 240V or 110V corded. Therefore, you will require access to electricity to operate this equipment. If you require alternative power means, speak to one of the team at WHC Hire Services.
Essential Steps To Take Before Using A Floor Sander
Before using a floor sander for the first time, there are some essential steps to take before getting started. Addressing these will help protect you and the equipment during operation. It is crucial that you do not skip any of the following steps:
Prepare The Working Area
Make sure to remove all furniture from the room before you start. This helps prevent any damage and reduces the risk of accidents. In some cases, you may also need to lift any existing carpet to expose the floorboards underneath.
Remove Proud Nails or Screws
It’s important to remove or flatten any nails or screws that stick out from the floorboards. You can either knock them flush or take them out completely. If left, they could cause serious damage to the floor sander.
Pop On Your PPE & Ensure Good Ventilation
Remember that it is so important to protect yourself when operating power tools. We highly advise sturdy boots, eye protection, a dust mask and gloves. Where possible, try to encourage good ventilation and prevent dust from accumulating in the air.
Load The Sander With Coarse Grit
Load the rotating belt on the floor sander with a coarse grit to begin with. 24-40 grit is a good place to start. Then, proceed to sand in the direction of the grain on the floor.
Load With Medium Grit
After your first pass with the lower grit, repeat the method with a medium grit reel. Again, follow the direction of the grain on the floorboards for best results.
Finishing Grit
Once you have completed your second pass with a medium grit, switch to the finishing 120 grit to get a smooth surface finish.
Tackle The Edges
Once you’ve sanded most of the floor, it’s time to tackle the edges — either by hand or, if you’ve hired a sanding bundle, with an edge sander. Use the same process as before, working through the different grit levels to achieve a smooth finish.
Clean Up
Floor sanding can be a very messy process, therefore, we recommend you sweep or vacuum before switching grits.
Finishing Touches
Once you have reached your desired finish, it is time to do a final vacuum before staining or resealing your wooden floor.
How To Apply Grit Sheets
While loading grit sheets onto either a floor or edging sander is quite simple, it is vital you know how before getting started.
Floor Sander
- Begin with the floor sander switched off and tilted on its back on the floor. Lift the flap and loosen the screws on the machines drum’s gripper using a flathead screwdriver.
- Attach one end of the sanding sheet to the gripper bar with the grit facing towards you. Then, proceed to rotate the drum by hand until you can fit the other end of the sheet underneath, covering the entire drum.
- Pull the sheet tight against the drum and re tighten the screws so that the bar locks the grit sheet into place. Ensure you tighten the screws as close as possible to prevent the sheet from ripping off during operation.
- Finally, check that the drum can freely rotate before you begin sanding the floors.
Edge Sander
- While the device is switched off, turn the equipment upside down and unscrew the disk locking bolt with the key provided.
- Place a grit disk on the machine, ensuring to put the bolt through the disc.
- Re-tighten and ensure the disk is correctly centred.
- Repeat these steps whenever you need to change your discs or sheets.
Floor Sander Grit Sheets Explained
For the best results, always work from a coarse to a finer grit for the best results. The diagram below explains the different grit sheets and applications:

Common Mistakes To Avoid When Operating A Floor Sander
While floor sanders are relatively simple to use. It is essential to always read the operator’s manual before getting started. That said, there are a few common mistakes that many DIYers make when using this equipment for the very first time.
Even with the right equipment, small mistakes can seriously affect your results — and may even damage the floor sander. Here are the most common errors and how you can easily avoid them.
Leaving The Machine Running In The Same Place
When operating the floor sander, always keep it moving slowly. Leaving the machine running in one place can cause uneven wear and can lead to gouging.
Don’t Skip Sanding Grits
Always work methodically, starting with the rougher grit sheets before progressing to the finer ones. This reduces strain on the machine and helps you get the most out of each sheet — saving you money in the process.
Always Check For Nails
This is one of the most expensive mistakes DIYers can make when using a floor sander. Failing to remove or flatten nails can cause serious — and costly — damage to the machine. Before you start, double-check that all nails are either removed or knocked in flush with the floor.
Overloading The Dust Bag
This can lead to several problems, such as a decrease in the machine’s efficiency, while increasing the risk of bag ruptures and explosions. If a dust bag is full, then simply change it out for another, or delicately empty the contents.
Sanding Across The Grain
Avoid sanding across the grain, as it can damage your flooring by causing scratches, gouges, or even tearing the wood fibres. For the best finish, always sand in the direction of the grain. If you are looking to relevel your wooden flooring with a floor sander, sand at a 45-degree angle against the grain for the best results.
Using Too Much Pressure
Applying too much downward pressure with a floor sander can lead to multiple complications such as surface damage, motor strain and machine inefficiency. Whether you are using a floor or edge sander, always allow the equipment to do the work for you.
Why Hire A Floor Sander From WHC Hire Services?
If you are looking to hire a floor sander or sanding package from a reputable tool hire supplier, then WHC Hire Services can help. For over 25 years, we’ve helped homeowners and renovators transform their wooden flooring with high-quality equipment.
Here are some key reasons why customers choose us for floor sander hire:
High-Quality Machinery
Maintained and tested to the highest industry standards.
Flexible Hire Options
Single day to full week hire options available to suit your timescales
Expert Advise
We’ve been doing this a long time and our friendly, helpful staff are always here to guide you.
Equipment Demonstrations
When we hand over the equipment to you, we’ll give you a demonstration of how it all works.
Quick Booking
Online, by phone or at your nearby local depot, we make it simple to get the sanding package you need.
Sanding Accessories
We supply everything you need with your floor or edge sander, including grit sheets, dust bags and more. We’ll only charge you for what you use.
Affordable Prices
WHC floor sander and sanding packages can be tailored to all renovation budgets, with no hidden costs.
Whether it is your first or fifth time hiring a floor sander, WHC Hire will be with you every step of the way.
Confident To Hire A Floor Sander?

Hiring a floor sander can be an extremely efficient way of transforming your wooden flooring. With the correct machine and the guidance that we’ve outlined in this article, you are sure to supercharge your home renovation efforts.
Get started today by viewing our floor sanders we have to offer.
Or contact your local depot today to reserve your equipment.